TypeScript, tsconfigでの自動コンパイル #TypeScript #javascript
index:
環境
TypeScript
node.js
npm
コンパイル方法
tsconfig.json
https://github.com/kuc-arc-f/ts_start2/blob/master/tsconfig.json
dist の下に、出力されます
{
  "compilerOptions": {
    "target": "es6",                          /* Specify ECMAScript target version: 'ES3' (default), 'ES5', 'ES2015', 'ES2016', 'ES2017','ES2018' or 'ESNEXT'. */
    "module": "commonjs",                     /* Specify module code generation: 'none', 'commonjs', 'amd', 'system', 'umd', 'es2015', or 'ESNext'. */
    "outDir": "./dist",                        /* Redirect output structure to the directory. */
    "strict": true,                           /* Enable all strict type-checking options. */
    "esModuleInterop": true                   /* Enables emit interoperability between CommonJS and ES Modules via creation of namespace objects for all imports. Implies 'allowSyntheticDefaultImports'. */
  }
}・tscコマンド
下記プロセスを、起動きておきます。
tsファイルがコンパイルされます。
tsc -W
参考の設定
関連のページ
TypeScriptの導入編
index:
概要:
TypeScript の導入メモとなります
・ javascript派生で、進化系言語のイメージあります
コンパイラでのチェックがされたり、
モジュールのインポート、
クラスが使えて便利な部分は ありそうです。
環境
TypeScript
node.js
npm
参考にしたページ
https://www.typescriptlang.org/
https://www.typescriptlang.org/docs/handbook/typescript-in-5-minutes.html
・型や、クラスなど
https://www.typescriptlang.org/docs/handbook/basic-types.html
https://www.typescriptlang.org/docs/handbook/interfaces.html
追加の手順
npm install -g typescript
コード書きます
https://github.com/kuc-arc-f/ts_start1/blob/master/greeter1.ts
function greeter(person: string) {
    return "Hello, " + person;
}

let user = "Jane User112233";

console.log( greeter(user) );
document.body.textContent = greeter(user);
tsc コンパイル
tsc greeter.1ts
greeter1.js が生成されます
・HTMLから、読み込み
<!DOCTYPE html>
<html>
    <head><title>TypeScript Greeter</title></head>
    <body>
        <script src="greeter1.js"></script>
    </body>
</html>
・クラスの例
class Student {
    fullName: string;
    constructor(public firstName: string, public middleInitial: string, public lastName: string) {
        this.fullName = firstName + " " + middleInitial + " " + lastName;
    }
}

interface Person {
    firstName: string;
    lastName: string;
}

function greeter(person: Person) {
    return "Hello, " + person.firstName + " " + person.lastName;
}

let user = new Student("Jane", "M.", "User1111");

document.body.textContent = greeter(user);
mongoDB 4を、Ubuntuにインストールする
index:
概要:
mongodb 4.2を、Ubuntu16 にインストールして使用メモとなります
環境
mongo DB 4.2
Ubuntu16
追加の手順
上記ページの、手順と同じですが。
wget -qO - https://www.mongodb.org/static/pgp/server-4.2.asc | sudo apt-key add -

echo "deb [ arch=amd64 ] https://repo.mongodb.org/apt/ubuntu xenial/mongodb-org/4.2 multiverse" | sudo tee /etc/apt/sources.list.d/mongodb-org-4.2.list

sudo apt-get update

sudo apt-get install -y mongodb-org

echo "mongodb-org hold" | sudo dpkg --set-selections
echo "mongodb-org-server hold" | sudo dpkg --set-selections
echo "mongodb-org-shell hold" | sudo dpkg --set-selections
echo "mongodb-org-mongos hold" | sudo dpkg --set-selections
echo "mongodb-org-tools hold" | sudo dpkg --set-selections
起動
sudo service mongod start
停止するときは
sudo service mongod stop
mongo のログ
v4.2 で、起動してますね。
app4$ mongo
MongoDB shell version v4.2.0
connecting to: mongodb://127.0.0.1:27017/?compressors=disabled&gssapiServiceName=mongodb
Implicit session: session { "id" : UUID("e0cc8937-6984-47a1-9661-81a6e05f7320") }
MongoDB server version: 4.2.0
Server has startup warnings:
2019-09-14T11:10:13.216+0900 I  STORAGE  [initandlisten]
2019-09-14T11:10:13.216+0900 I  STORAGE  [initandlisten] ** WARNING: Using the XFS filesystem is strongly recommended with the WiredTiger storage engine
2019-09-14T11:10:13.216+0900 I  STORAGE  [initandlisten] **          See http://dochub.mongodb.org/core/prodnotes-filesystem
2019-09-14T11:10:14.426+0900 I  CONTROL  [initandlisten]
2019-09-14T11:10:14.426+0900 I  CONTROL  [initandlisten] ** WARNING: Access control is not enabled for the database.
2019-09-14T11:10:14.426+0900 I  CONTROL  [initandlisten] **          Read and write access to data and configuration is unrestricted.
2019-09-14T11:10:14.426+0900 I  CONTROL  [initandlisten]
---
Enable MongoDB's free cloud-based monitoring service, which will then receive and display
metrics about your deployment (disk utilization, CPU, operation statistics, etc).

The monitoring data will be available on a MongoDB website with a unique URL accessible to you
and anyone you share the URL with. MongoDB may use this information to make product
improvements and to suggest MongoDB products and deployment options to you.

To enable free monitoring, run the following command: db.enableFreeMonitoring()
To permanently disable this reminder, run the following command: db.disableFreeMonitoring()
---

>
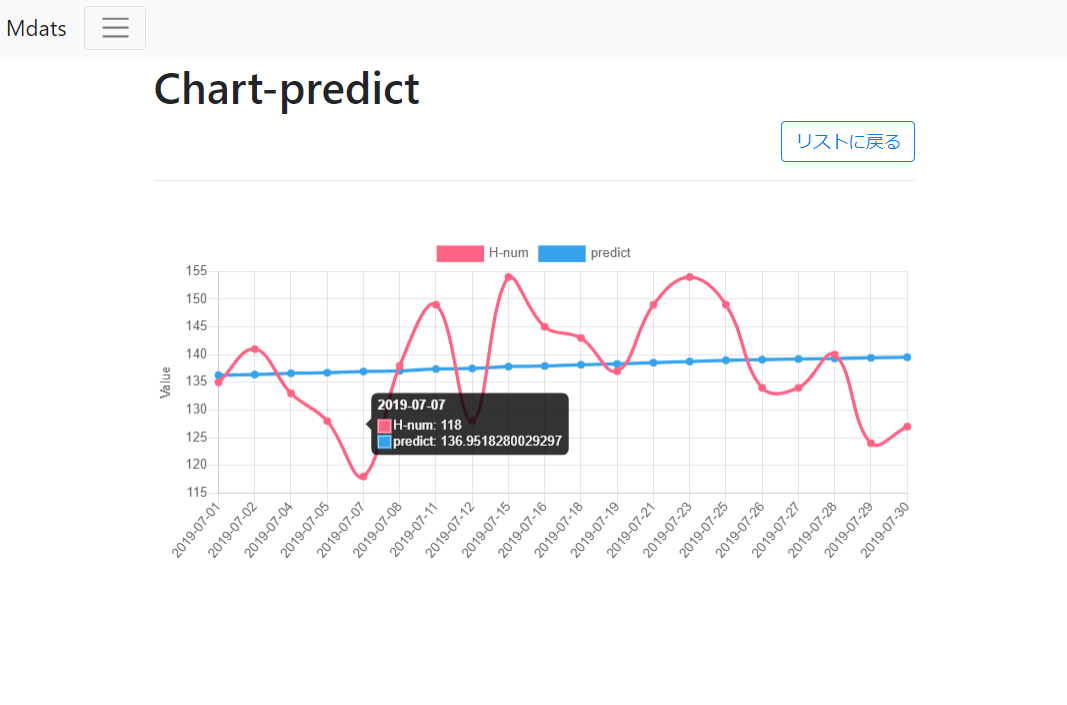
機械学習の予測結果をsqlite3に保存して、chart.jsでグラフ表示する。
index:
概要:
前のVue.js + express 関連になりますが、
機械学習の予測結果を
sqlite3に保存する例となります
流れとしては、下記となります
・測定データCSVを学習処理
・予測の出力を、CSV保存
・予測CSVを、sqliteにインポート
・DBから、グラフ表示
環境
node.js 10.16.0
express : 4.16.1
sqlite3
画面

実装など
・予測結果を、CSV出力します
https://github.com/kuc-arc-f/predict_sqlite
・予測結果を、インポート
dat/out_pred.csv
https://github.com/kuc-arc-f/app7_sqlite_pred/blob/master/pred_import.js
・結果の表示、 ejs
https://github.com/kuc-arc-f/app7_sqlite_pred/blob/master/views/mdats/chart_pred.ejs
CSVデータから sqlite3に保存して、chart.jsでグラフ表示する。
この記事は、note 有料マガジンで。公開しております
https://note.com/knaka0209/m/mc26dade9f854
React.js +node/express + sqlite3 で、CRUDの作成
index:
概要:
前の React.js+ express 関連となりますが
sqlite3 で CRUDの作成 となります。
環境
node.js 10.16.0
express : 4.16.1
React
react-dom
sqlite3
参考のコード
実装など
・表の作成
https://github.com/kuc-arc-f/app7_react_sqlite/blob/master/doc/tasks.sql
・index / api
router.get('/tasks_index', function(req, res) {
    var db = new sqlite3.Database( dbfileName )
    var items = []
    db.serialize(function() {
        db.all('SELECT id,title, content FROM tasks order by id desc;', function(err, rows) {
            rows.forEach( function (item) {
                items.push(item  );
            });
            var param = {"docs": items };
            res.json(param);
        });
    });
    db.close();
});
画面 / React.js
・new
https://github.com/kuc-arc-f/app7_react_sqlite/blob/master/views/task2/new.ejs
・index
https://github.com/kuc-arc-f/app7_react_sqlite/blob/master/views/task2/index.ejs
・show
https://github.com/kuc-arc-f/app7_react_sqlite/blob/master/views/task2/show.ejs
・edit/delete
https://github.com/kuc-arc-f/app7_react_sqlite/blob/master/views/task2/edit.ejs
Vue.js + node/express + sqlite3 で、 CRUDの作成
この記事は、note 有料マガジンで。公開しております
https://note.com/knaka0209/m/mc26dade9f854